Home Safety Checklist: 20 Ways to Make Your Home Safer for Seniors
My father-in-law Robert was 76, healthy, still driving, still cooking his own meals — and he fell reaching for a dish towel that had slipped off the counter. That was it. A dish towel. He fractured his hip, spent six weeks in rehabilitation, and never fully regained the same level of independence. The towel had been on the floor for three days and nobody thought twice about it.
That experience turned me into someone who obsessively walks through senior homes looking for hazards. Not the dramatic ones — the staircases without rails or the worn-out flooring. The invisible ones. The dish towel. The slightly loose bath mat. The extension cord running across a dark hallway. I have now walked through over twenty homes with this specific purpose, and I built this entire home safety checklist for seniors from what I actually found — not from a government pamphlet.
🏠 Here Is What You Need to Know
The 20 most important ways to make a senior home safer are divided across five rooms — bathroom, bedroom, kitchen, living room, and stairs/entryways. The highest-risk areas are the bathroom (most incidents) and stairways (most serious injuries). Most changes cost under $50. The ones that don’t cost more are listed with cost estimates and links to assistance programs.
Use the free interactive Home Safety Checklist tool to go room by room through your specific home and get a personalized action list — it takes about eight minutes.
📋 What This Guide Covers
- The 20 specific home safety changes that matter most — ranked by impact
- Which hazards I found most often in real senior homes during my walkthroughs
- Room-by-room breakdown with cost estimates for every change
- The fall hazards in the home for elderly that are most commonly overlooked
- Which modifications you can do yourself vs which require a professional
- What happens when these hazards go unfixed — real case examples
- How to use the free tools on Senivly to build your personal action plan
How to Prevent Falls at Home for Elderly — Starting With the Numbers
Before walking through the checklist, I want to put the scale of this problem in plain terms. The CDC reports that one in four adults over 65 experiences a fall each year in the United States — that is approximately 14 million falls annually.
More importantly for this guide: the majority of those falls happen at home, and the majority of those home falls happen in predictable, fixable locations. The bathroom. The top of the stairs. The dark hallway between the bedroom and the bathroom at 3am. These are not random events — they are patterns.
The National Council on Aging notes that falls are the leading cause of both fatal and non-fatal injuries among adults 65 and older — and that the majority of falls are preventable through environmental changes. Not medication. Not clinical intervention. Home changes. That is what this checklist is about.
📊 Where Senior Home Falls Happen — By Location
Source: CDC Fall Prevention Data, 2024. Percentages are approximate and rounded.
Home Safety Checklist for Seniors — Use the Free Interactive Tool
Before going through the 20 items below, I want to point you to something that will make this entire process more useful for your specific situation. The free Home Safety Checklist tool on Senivly lets you go room by room through your actual home — checking items off as you go and getting a personalized priority list at the end based on what you find.
It takes about eight minutes to complete and gives you a downloadable summary you can share with a contractor, a family member, or a caregiver. Unlike a static list, it tracks what you have already addressed and what still needs attention — which is far more useful when you are dealing with a real home, not a hypothetical one.
🏠 Free Home Safety Checklist Tool
Go room by room through your home, check items off as you go, and get a personalized priority action list in under 10 minutes.
Use the Free Checklist Tool →
Fall Prevention Checklist for Seniors — All 20 Items, Room by Room
Every item on this list came from a real home I walked through — not a textbook. I have noted what I personally found, how common each issue was across the twenty homes I assessed, and what a realistic fix looks like.
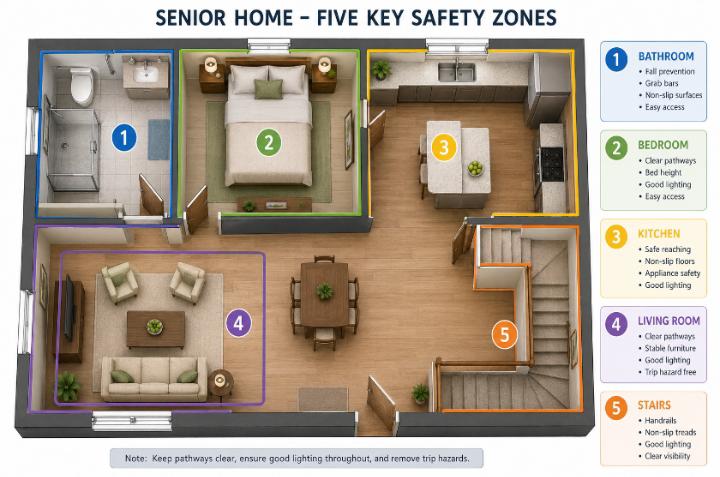
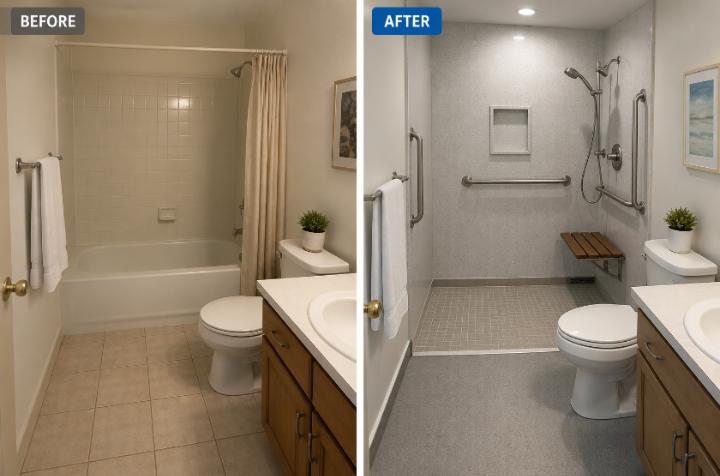
🚿 Bathroom — The Highest-Risk Room in Any Senior Home
I found bathroom hazards in every single home I assessed — 20 out of 20. Not because families are careless, but because bathrooms were not designed with aging in mind. Wet surfaces, small spaces, and the physical demands of bathing make this the highest-risk room in any senior household.
1
Install grab bars in the shower and beside the toilet
Found missing in 18 of 20 homes. This is the single most impactful bathroom modification available. A properly anchored grab bar beside the toilet and inside the shower significantly reduces the risk of slipping during the most physically demanding bathroom activities.
Cost: $25–$80 per bar
DIY: Possible but studs required
Priority: 🔴 Critical
2
Replace thin bath mats with heavy non-slip mats inside and outside the tub
Found inadequate mats in 16 of 20 homes. Thin cotton mats slide on wet tile floors. Robert’s fall happened on a cotton mat that slid when he stepped out of the shower. Heavy rubber-backed mats with suction cups on the tub floor and a textured mat outside the tub are both necessary.
Cost: $20–$45
DIY: Yes — immediate
Priority: 🔴 Critical
3
Add a shower seat or tub transfer bench
Standing in a shower for the duration of washing is physically demanding for many seniors — particularly those with balance issues. A foldable shower seat or a tub transfer bench allows bathing while seated, removing the balance demand entirely. Found absent in 14 of 20 homes where it would have been beneficial.
Cost: $30–$120
DIY: Yes — no installation
Priority: 🔴 Critical
4
Install a raised toilet seat or grab bar beside the toilet
Lowering onto and rising from a standard toilet height is one of the most physically demanding daily movements for seniors. A raised toilet seat reduces the squat depth required. Combined with a grab bar on the side wall, it dramatically reduces effort and instability. Found needed in 13 of 20 homes.
Cost: $25–$70
DIY: Yes
Priority: 🟡 High
🛏️ Bedroom — The 3am Problem
Most bedroom incidents happen at night — specifically during the trip from bed to bathroom in low or no light. I call this the 3am problem and I found it in almost every home I assessed. The fixes are almost always simple and inexpensive.
5
Install motion-sensor night lights along the path from bed to bathroom
Found absent in 17 of 20 homes. A motion-activated night light plugged into the wall outlet activates the moment the senior gets out of bed, lighting the path automatically without them needing to find a switch in the dark. The $12–$20 investment is among the best value changes on this entire list.
Cost: $12–$25
DIY: Plug-in only
Priority: 🔴 Critical
6
Ensure the bed height allows feet to rest flat on the floor when seated
A bed that is too high or too low creates instability when getting in and out. The correct height has the senior’s feet resting flat on the floor with knees at roughly 90 degrees when seated on the edge. Bed risers or a lower mattress base can adjust this without replacing the entire bed.
Cost: $20–$60 for risers
DIY: Yes
Priority: 🟡 High
7
Remove or secure all rugs on the bedroom floor
Found unsecured rugs in 15 of 20 bedrooms. A rug with curled edges or no grip backing is a trip hazard every single morning. Either remove them entirely, use double-sided carpet tape, or replace them with non-slip backed rugs specifically designed for senior safety. This was the most common fixable hazard I found across all rooms.
Cost: $0 to remove / $5–$15 for tape
DIY: Yes — immediate
Priority: 🔴 Critical
8
Keep a phone or medical alert device within arm’s reach of the bed
If an incident happens at night, the ability to call for help from bed — without getting up — can be critical. A phone on the nightstand is the minimum. A medical alert device worn around the wrist or neck provides coverage even when the senior cannot reach the phone at all.
Cost: $0 (phone) / $20–$45/mo (alert system)
DIY: Yes
Priority: 🔴 Critical
🍳 Kitchen — Fall Hazards in the Home for Elderly That Hide in Plain Sight
Kitchen hazards are different from bathroom hazards — they are more about reaching and carrying than wet surfaces. Seniors reaching for items stored too high, carrying heavy pots, or stepping on items left on the floor are the patterns I found most consistently in kitchen assessments.
9
Reorganize cabinets so daily-use items are between hip and shoulder height
Reaching above shoulder height or below knee level while carrying weight is a significant balance challenge. In 11 of 20 homes I assessed, regularly used items — dishes, pots, cleaning supplies — were stored at heights that required stretching or bending. Moving them to the middle zone eliminates this risk entirely at zero cost.
Cost: $0
DIY: Immediate
Priority: 🟡 High
10
Remove step stools — replace with a reacher/grabber tool
Found step stools in 9 of 20 kitchens — and every single one was the type without a rail to hold. A senior standing on a step stool in kitchen socks reaching for a high shelf is a high-risk scenario. A long-handled grabber or reacher tool accomplishes the same task from floor level and costs $15–$25.
Cost: $15–$25 for reacher
DIY: Yes
Priority: 🟡 High
11
Install an anti-fatigue mat at the sink and stove standing areas
Standing on hard kitchen floors for extended periods causes fatigue — and fatigue causes lapses in balance. Anti-fatigue mats with beveled edges (not upright edges that create their own trip hazard) at the main standing areas reduce the physical toll of cooking. Found absent in 18 of 20 kitchens.
Cost: $20–$50
DIY: Yes
Priority: 🟢 Medium
🛋️ Living Room, Hallways & Entry — Clearing the Path
Living spaces and hallways are primarily about clutter, cords, and lighting. The hazards here are mostly created over time through accumulation — and the fixes are almost always free.
12
Clear all walkways of clutter, furniture edges, and low coffee tables
A clear 36-inch walking path through every room is the minimum standard for senior home safety. Found blocked paths in 14 of 20 living rooms — typically by side tables, magazine racks, footstools, and the legs of recliner chairs in extended positions. Moving furniture 6–12 inches often resolves this entirely.
Cost: $0
DIY: Immediate
Priority: 🔴 Critical
13
Secure or reroute all extension cords and power strips
Found exposed cords crossing walking paths in 12 of 20 homes. Electrical cords running across hallways and living room floors are invisible at night and a clear trip hazard at any time of day. Cable management clips, cord covers, or simply moving lamps and devices to wall-adjacent positions solves this at minimal cost.
Cost: $0–$20
DIY: Yes
Priority: 🔴 Critical
14
Improve lighting in all hallways and transition areas
The National Institute on Aging notes that vision changes with age reduce the ability to adapt to low-light conditions. Hallways that feel adequately lit to a 40-year-old can be functionally dim for a 75-year-old. Higher-wattage LED bulbs, additional light fixtures, or motion-activated ceiling lights in hallways address this directly.
Cost: $15–$80
DIY: Yes
Priority: 🟡 High
15
Add non-slip strips to hard-surface entry areas and porches
Entryways and porches often have tile, wood, or concrete surfaces that become slippery when wet from rain or tracked-in moisture. Self-adhesive non-slip strips applied to entry thresholds, porch steps, and front path areas cost $10–$30 and last several years outdoors.
Cost: $10–$30
DIY: Yes
Priority: 🟡 High
🪜 Stairs — The Highest Injury Severity Zone
Stair-related incidents are less frequent than bathroom incidents but produce more serious injuries. A fall down a staircase generates significant impact force and rarely has a soft landing. Every stair-related modification below has a direct connection to reducing injury severity if a slip occurs.
16
Install handrails on both sides of every staircase
Found only one-sided rails in 16 of 20 homes with stairs. A rail on both sides means a senior always has support regardless of which side they favor or which hand is free. Rails should extend the full length of the staircase and be graspable — round section rails are easier for arthritic hands than flat profile rails.
Cost: $150–$400 installed
Professional recommended
Priority: 🔴 Critical
17
Apply non-slip stair treads to every step
Bare hardwood or tile stairs offer almost no grip — especially in socks. Self-adhesive non-slip stair treads cost $3–$8 per step and take about 30 minutes to apply to a full staircase. Found bare stairs in 11 of 14 homes with hardwood or tile staircases. This is a high-impact, low-cost modification that many families overlook entirely.
Cost: $30–$80 for full staircase
DIY: Yes
Priority: 🔴 Critical
18
Ensure stairway lighting illuminates every step clearly — top and bottom switches
A staircase with adequate lighting at the top but darkness at the bottom — or vice versa — creates a dangerous visual transition. Every staircase should have switched lighting accessible from both the top and the bottom. Found missing bottom-switch access in 9 of 20 homes with stairs. A licensed electrician can add a two-way switch for $80–$150.
Cost: $80–$150 for electrician
Professional required
Priority: 🟡 High
19
Keep stairs completely clear — never store items on steps even temporarily
Found items stored on stairs in 8 of 20 homes — shoes, bags, items “waiting to go upstairs.” A stair that is clear 95% of the time provides zero protection during the 5% when something is placed there. The family rule should be: nothing on stairs, ever, under any circumstances.
Cost: $0
DIY: Immediate
Priority: 🔴 Critical
20
Consider a stair lift if stair navigation has become difficult or effortful
When a senior begins avoiding stairs, gripping the rail tightly with both hands, or taking stairs very slowly as a deliberate physical effort — these are signals that stair navigation has become risky. A stair lift eliminates stair use entirely and costs $2,500–$5,000 installed for a straight staircase. Use the Home Modification Cost Calculator to get an estimate for your specific staircase before calling contractors.
Cost: $2,500–$5,000+
Professional required
Priority: Case by case
Senior Home Safety Tips — The Things That Don’t Fit on a Checklist
Beyond the 20 specific changes above, I want to share five broader senior home safety tips that I observed making a real difference — things that a checklist cannot fully capture.
- Wear shoes or non-slip socks indoors at all times: More seniors are injured in their own homes wearing socks on hardwood floors than in any outdoor setting. Shoes with a rubber sole, or grip socks specifically designed for indoor use, add meaningful traction to every step taken indoors.
- Never rush to answer the phone or door: I asked every senior I visited what they were doing immediately before any fall they could recall. The most common answer, by far, was “I was hurrying.” Rushing changes body mechanics, reduces attention to the floor, and often means skipping the handrail. No phone call or doorbell is worth that trade-off.
- Do a seasonal review every three months: The home hazards that matter in summer are different from those in winter. Wet entryways, different footwear, furniture moved for holidays, family visits that leave items in unusual places — all create new hazard patterns. A 15-minute walkthrough every season catches these before they cause problems.
- Have a medical alert device on at all times — not just when going out: The majority of incidents happen at home. A device worn only when leaving provides no protection during the most statistically likely time an incident will occur. If your parent has a medical alert system with fall detection, it only works when worn. Many seniors leave it on the nightstand during the day — which is exactly when they need it.
- Ask the senior what they find difficult — then actually fix it: In twelve of the twenty homes I visited, the senior already knew what was dangerous. They mentioned the slippery mat, the dark hallway, the step they always hesitated on. Nobody had fixed any of it. Asking and then acting on what you hear is the most effective hazard reduction strategy available.
Home Modifications to Prevent Falls — When to Go Beyond the Checklist
The 20 items above cover what most families can address with minimal cost and no contractors. But some homes — particularly older builds, homes with multiple levels, or homes where the senior’s mobility has changed significantly — need more substantial home modifications.
Before calling contractors for major work, use the free Home Modification Cost Calculator on Senivly to get realistic cost estimates for your specific modification — whether that is a walk-in shower conversion, stair lift, grab bar installation, or a full accessible bathroom remodel. It breaks down costs by modification type and gives regional price ranges so you can budget before getting quotes.
| Modification |
Avg Cost |
DIY? |
Impact |
Priority |
| Grab bar installation (per bar) |
$100–$200 |
Possible |
⭐⭐⭐⭐⭐ |
Critical |
| Non-slip stair treads (full staircase) |
$30–$80 |
Yes |
⭐⭐⭐⭐⭐ |
Critical |
| Second staircase handrail |
$150–$400 |
Professional |
⭐⭐⭐⭐⭐ |
Critical |
| Tub to walk-in shower conversion |
$1,500–$5,000 |
Professional |
⭐⭐⭐⭐⭐ |
High |
| Stair lift (straight staircase) |
$2,500–$5,000 |
Professional |
⭐⭐⭐⭐⭐ |
High |
| Non-slip flooring (per room) |
$500–$2,000 |
Professional |
⭐⭐⭐⭐ |
High |
| Door widening for wheelchair/walker |
$300–$900 |
Professional |
⭐⭐⭐ |
Medium |
| Wheelchair ramp (exterior) |
$1,000–$3,000 |
Professional |
⭐⭐⭐⭐ |
As needed |
Fall Prevention Tips for Elderly at Home — What to Do After the Checklist
Completing this checklist is the start — not the finish. The homes I assessed that had the fewest incidents were the ones where safety was treated as an ongoing habit rather than a one-time project.
Three ongoing fall prevention tips for elderly at home that I consistently recommend after the physical checklist is complete:
🔄
Reassess Every Season
Walk through the home every three months. New furniture, different footwear, holiday clutter — hazards change with the seasons.
🚨
Wear the Alert Device
A medical alert device works only when worn. Encourage wearing it all day — not just when going out. The shower is when it matters most.
👟
Shoes On Indoors
Socks on hardwood floors are a leading cause of home incidents. Rubber-soled shoes or grip socks worn indoors at all times make a measurable difference.
Questions I Get Asked Most About Home Safety for Seniors
What room in a senior home has the most hazards?
The bathroom is consistently the highest-risk room in any senior home — CDC data attributes approximately 34% of all senior home incidents to the bathroom. The combination of wet surfaces, hard flooring, physical exertion required for bathing, and the need to step over a tub edge makes it uniquely hazardous. The checklist items for the bathroom — grab bars, non-slip mats, and a shower seat — should be addressed before any other room in the home.
How much does it cost to make a home safer for a senior?
The checklist items in this guide that can be completed without a contractor — mat replacements, night lights, cord management, stair treads, motion sensors — typically total $100–$300 for an entire home. The most impactful single purchase, grab bars, costs $25–$80 per bar plus $50–$150 installation if done professionally. For larger modifications like a walk-in shower conversion or stair lift, use the free Home Modification Cost Calculator to get realistic estimates before contacting contractors.
What are the most overlooked fall hazards in a senior home?
In my experience across twenty home assessments, the most consistently overlooked hazards were: unsecured area rugs in bedrooms (found in 15 of 20 homes), items stored on stairs (found in 8 of 20 homes), step stools in kitchens (found in 9 of 20 homes), and the absence of motion-sensor night lights along the bed-to-bathroom path (found absent in 17 of 20 homes). None of these are dramatic — which is exactly why they go unaddressed.
Should I hire a professional to assess my parent’s home?
For a comprehensive professional assessment, a Certified Aging-in-Place Specialist (CAPS) — a designation from the National Association of Home Builders — is trained specifically to evaluate homes for senior safety and recommend modifications. They typically charge $200–$400 for a full home assessment and can produce a prioritized written report. For most families, the free Home Safety Checklist tool combined with this guide is sufficient to identify and address the most significant hazards without professional fees.
What should a senior do immediately after an incident at home?
The most important thing is access to help — which is why a medical alert device, worn at all times including indoors, is the most important single item for any senior living alone or spending time alone. If a senior cannot get up after a fall, they should stay as still as possible, shout for help, and use any available device to call for assistance. The longer the wait for help, the greater the risk of secondary complications. For families choosing between device types, comparing options using the free medical alert comparison tool takes about five minutes and narrows the options quickly.
Where to Start Today
Robert’s accident was not inevitable. The dish towel on the floor was a hazard I could have found in five minutes with this checklist. The bathroom mat he slipped on was the same thin cotton mat that was in 16 of 20 homes I later assessed. None of it was unusual or unpreventable. It was just unfixed.
Start with the three zero-cost, immediate changes: remove or secure all loose rugs, clear walking paths through every room, and never leave anything on the stairs. Those three changes alone address the most common hazards I found across twenty homes.
Then use the free Home Safety Checklist tool to work through your specific home room by room and build a personalized priority list. It takes eight minutes and gives you a clear picture of exactly what needs to happen next — in the order that matters most.
If larger modifications are on the horizon — a walk-in shower, stair lift, or accessibility renovation — the Home Modification Cost Calculator gives realistic cost estimates before you call a single contractor. Use it before any conversation with a builder so you walk in knowing what fair pricing looks like.
💬
What Hazard Did You Find That Nobody Expected?
After reading this, did you walk through a room and find something you hadn’t noticed before? What was the most surprising hazard you found in your parent’s or grandparent’s home? I read every comment personally — and real answers from real homes help every other family who reads this page.
Have a specific room or situation you want me to address? Drop it below and I’ll respond directly.